Recover Lost Partitions with TestDisk
Rebuild corrupted partition tables, repair boot sectors, and recover deleted partitions. The trusted recovery tool used by IT professionals and sysadmins worldwide.
What is TestDisk?
A partition recovery and disk repair utility trusted by IT professionals, sysadmins, and data recovery specialists for over two decades.
Partition recovery that actually works
TestDisk is a free, open-source data recovery program built for one job: getting lost partitions back. Developed by Christophe Grenier under the CGSecurity project, TestDisk has been around since the early 2000s and remains the go-to tool when a partition table goes bad or a boot sector gets corrupted. It runs on Windows, macOS, Linux, FreeBSD, and even DOS.
The program operates through a text-based interface — no fancy GUI, just a sequence of screens that walk you through disk selection, partition analysis, and recovery. That terminal look puts some people off at first, but it is exactly what makes TestDisk lightweight and portable. The entire application is under 30 MB, requires no installation, and runs from a USB drive if you need it to.
What problems does it solve?
Partition tables can break for all kinds of reasons: failed OS upgrades, accidental deletion with disk management tools, virus damage, or bad sectors. When that happens, your data is still on the disk, but the operating system has no way to find it. TestDisk scans the drive sector by sector, locates the missing partitions, and rebuilds the partition table so the OS can see them again.
Beyond partition recovery, TestDisk repairs FAT12, FAT16, FAT32, and NTFS boot sectors using their backup copies. It can fix Master File Table (MFT) errors on NTFS volumes, recover deleted files from FAT, exFAT, NTFS, and ext2 filesystems, and copy files off damaged partitions even when the OS cannot mount them. Version 7.2 added APFS detection for modern Mac drives.
Who uses it?
TestDisk is a standard tool in the toolkit of Linux sysadmins and IT support teams. You will find it included on most Linux rescue disks and live CDs. Data recovery shops use it alongside commercial tools like R-Studio and Disk Drill for initial diagnosis. Home users turn to it after accidental disk formatting or when a drive stops booting. The program supports more than 30 filesystems, including NTFS, ext4, btrfs, HFS+, XFS, ZFS, and ReiserFS, making it useful across virtually any storage setup.
TestDisk comes bundled with PhotoRec, a companion tool focused on file-level recovery. PhotoRec carves files directly from disk surfaces and handles over 480 file formats, so between the two programs, most recovery scenarios are covered.
Ready to recover your data? Download TestDisk or read the getting started guide.
Key Features
TestDisk handles partition recovery, boot repair, and filesystem fixes that most other tools cannot touch. Here is what it brings to the table.
Partition Table Recovery
Rebuilds damaged or corrupted partition tables on MBR and GPT disks. If your drive suddenly shows as unallocated or the partition map is wiped, TestDisk scans the disk surface sector-by-sector to locate and restore the original layout.
Boot Sector Repair
Restores FAT12, FAT16, FAT32, and NTFS boot sectors from their backup copies. When Windows refuses to boot or shows “Operating System Not Found,” TestDisk can rebuild the boot record without a full reinstall.
MFT Mirror Repair
Fixes corrupted NTFS Master File Tables by copying data from the MFT mirror ($MFTMirr). The MFT stores every file and directory entry on an NTFS volume, so repairing it can bring an entire drive back to life.
FAT Table Reconstruction
Repairs corrupted FAT entries on FAT12, FAT16, and FAT32 volumes. This is particularly useful for USB flash drives and SD cards where the file allocation table frequently gets damaged from unsafe removal.
ext2/ext3/ext4 Superblock Recovery
Locates and restores backup superblocks on Linux ext filesystems. When the primary superblock is overwritten or corrupted, TestDisk finds alternate copies stored at regular intervals across the partition.
File Undelete
Recovers deleted files from FAT, exFAT, NTFS, and ext2 filesystems. As long as the data has not been overwritten, TestDisk can list deleted entries and copy them to a safe location on a different drive.
Copy Files from Damaged Drives
Lets you browse and copy files from partitions that your OS cannot mount. Even when the filesystem is partially corrupted, TestDisk reads the raw disk data to extract whatever files remain intact.
30+ Filesystem Support
Works with APFS, BeFS, btrfs, exFAT, ext2/3/4, HFS, HFS+, JFS, LUKS, LVM, NTFS, ReiserFS, UFS, XFS, ZFS, and more. Whatever filesystem your drive uses, TestDisk likely supports it.
Cross-Platform Portable
Runs on Windows, macOS, Linux, FreeBSD, and even DOS with zero installation required. Extract the archive and run the binary directly. The same tool works identically across all platforms.
Bundled with PhotoRec
Ships alongside PhotoRec, a companion file carving tool that recovers over 480 file formats including JPEG, PNG, PDF, DOCX, and ZIP. Where TestDisk fixes partitions, PhotoRec recovers individual files by signature.
Ready to recover your data? Download TestDisk and get started in minutes.
System Requirements
TestDisk runs on nearly any hardware. As a console-based utility, it needs almost no resources beyond raw disk access.
| Component | Minimum | Recommended |
|---|---|---|
| Operating System | Windows Vista (32-bit), macOS 10.6, Linux kernel 2.6.18, FreeBSD, or DOS | Windows 10/11 (64-bit), macOS 12+, or a recent Linux distribution (Ubuntu 22.04, Fedora 38) |
| Processor (CPU) | Any x86 or x86_64 processor; ARM and PowerPC also supported | 1 GHz dual-core or faster for quicker deep scans on large drives |
| RAM | 64 MB (console application with minimal memory usage) | 512 MB or more when scanning drives larger than 2 TB |
| Disk Space | ~30 MB for the application files (portable, no installation) | Extra free space equal to recovered data size for file copy operations |
| Privileges | Administrator (Windows) or root (Linux/macOS) for raw disk access | Same — no way around this requirement for partition-level operations |
| Dependencies | None on Windows or DOS; ncurses library on Linux | ncurses5 or ncurses6 on Linux; no additional packages on other platforms |
| Internet | Not required — TestDisk works fully offline | Optional, only needed to download the initial archive |
Download TestDisk
Get the latest stable release of TestDisk for your operating system. No installation required — extract and run. Includes PhotoRec for file-level recovery.
TestDisk 7.2 for Windows (64-bit)
Download TestDiskPortable — no installer needed. Extract the ZIP and run testdisk_win.exe
TestDisk is portable software. After downloading, extract the archive to any folder and run testdisk_win.exe (Windows), testdisk (Linux/macOS), or testdisk.exe (DOS). Administrator or root privileges are required for raw disk access. TestDisk bundles PhotoRec for file-by-file recovery of over 480 formats.
Screenshots
See TestDisk in action — the console interface walks you through disk selection, partition analysis, and recovery step by step.
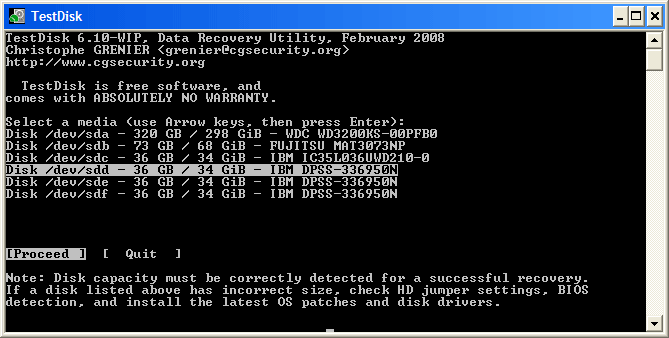
TestDisk uses a text-based console interface — no GUI required. Navigate with arrow keys and Enter.
Getting Started with TestDisk
A hands-on walkthrough for downloading, running, and recovering your first partition with TestDisk 7.2 on Windows, macOS, and Linux.
Downloading TestDisk
Head to our download section above to grab TestDisk 7.2, the latest stable release from February 2024. You will find separate packages for Windows (64-bit and 32-bit), macOS Intel, Linux x86_64, and even DOS. Pick the one that matches your operating system and CPU architecture.
If you are running Windows 10 or 11 on a modern PC, go with the Windows 64-bit package. It is a 26.4 MB zip file and downloads in under a minute on most connections. Running an older 32-bit machine? The 32-bit build (26.3 MB) works on Windows Vista through Windows 11. On macOS, the Intel 64-bit archive is just 1.5 MB. Linux users get a compact 7.5 MB tarball.
TestDisk ships as a portable application, so there is no .exe installer or .msi package to deal with. You download a zip (Windows) or tar.bz2 (macOS/Linux), extract it, and run the binary directly. This also means you can keep TestDisk on a USB stick for emergency recovery situations where the main drive will not boot.
For development builds with the newest features (like improved APFS support), there is also a 7.3-WIP rolling release. Stick with 7.2 stable unless you specifically need a fix from the development branch.
Installation Walkthrough
TestDisk has no installer. Extraction is the entire “installation” process, and it takes about 30 seconds.
Windows
- Right-click the downloaded
testdisk-7.2.win64.zipfile and select Extract All. Choose a location you can find easily, like your Desktop or aC:\Toolsfolder. - Open the extracted
testdisk-7.2folder. Inside, you will seetestdisk_win.exe,photorec_win.exe,qphotorec_win.exe, several DLL files, and documentation. - Right-click
testdisk_win.exeand choose Run as administrator. TestDisk needs raw disk access to scan for lost partitions, so admin privileges are required.
macOS
- Open Terminal (Applications → Utilities → Terminal).
- Navigate to your Downloads folder:
cd ~/Downloads - Extract the archive:
tar -xjf testdisk-7.2.mac_intel_x86_64.tar.bz2 - Run TestDisk with root access:
sudo testdisk-7.2/testdisk
Linux
Most Linux distributions include TestDisk in their package repositories, so you can skip the manual download entirely:
sudo dnf install testdisk # Fedora/RHEL
sudo pacman -S testdisk # Arch Linux
If you prefer the standalone binary, extract the tarball and run sudo ./testdisk-7.2/testdisk_static from the extracted directory. The _static binary bundles all dependencies so you do not need to install ncurses separately.
Initial Setup & Configuration
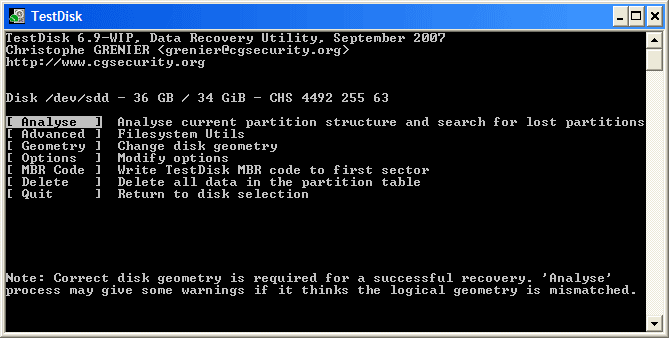
TestDisk has no settings file or configuration wizard. When you launch it, the first screen asks you about logging. You get three options:
- Create – Start a fresh log file called
testdisk.login the current directory. Pick this one. - Append – Add to an existing log if you ran TestDisk before on the same disk.
- No Log – Skip logging entirely. Not recommended because the log helps troubleshoot if something goes wrong.
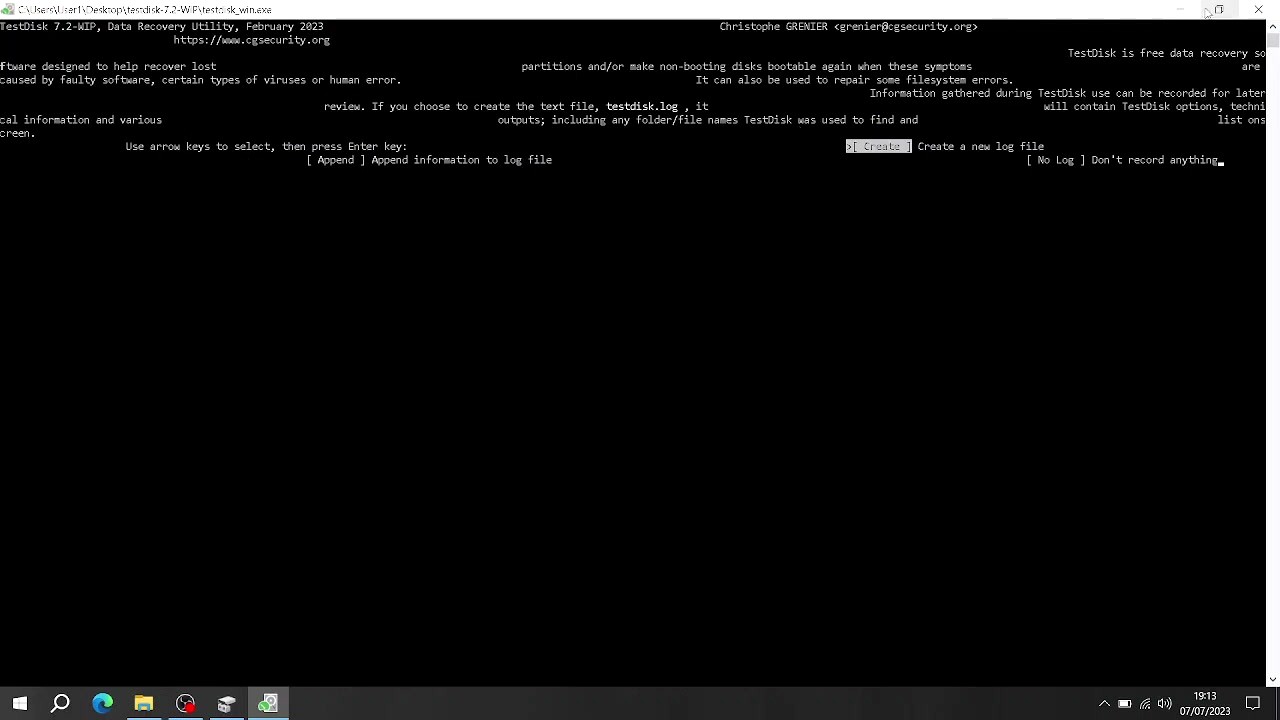
Select Create using the arrow keys and press Enter. TestDisk then scans your system for connected drives and shows a list of all detected disks with their model name, serial number, and capacity.
Next, TestDisk asks you to confirm the partition table type. On modern PCs this is almost always Intel (for MBR) or EFI GPT (for UEFI systems). TestDisk auto-detects the correct type in most cases. If your disk uses GPT partitioning (most Windows 10/11 machines do), select EFI GPT. For older systems with MBR, keep the default Intel selection.
TestDisk does not modify your disk until you explicitly tell it to write changes. Every scan and analysis operation is read-only, so you can explore safely without risk.
Your First Partition Recovery
Let’s walk through recovering a lost partition on a 500 GB drive. This is the core workflow that makes TestDisk so valuable.
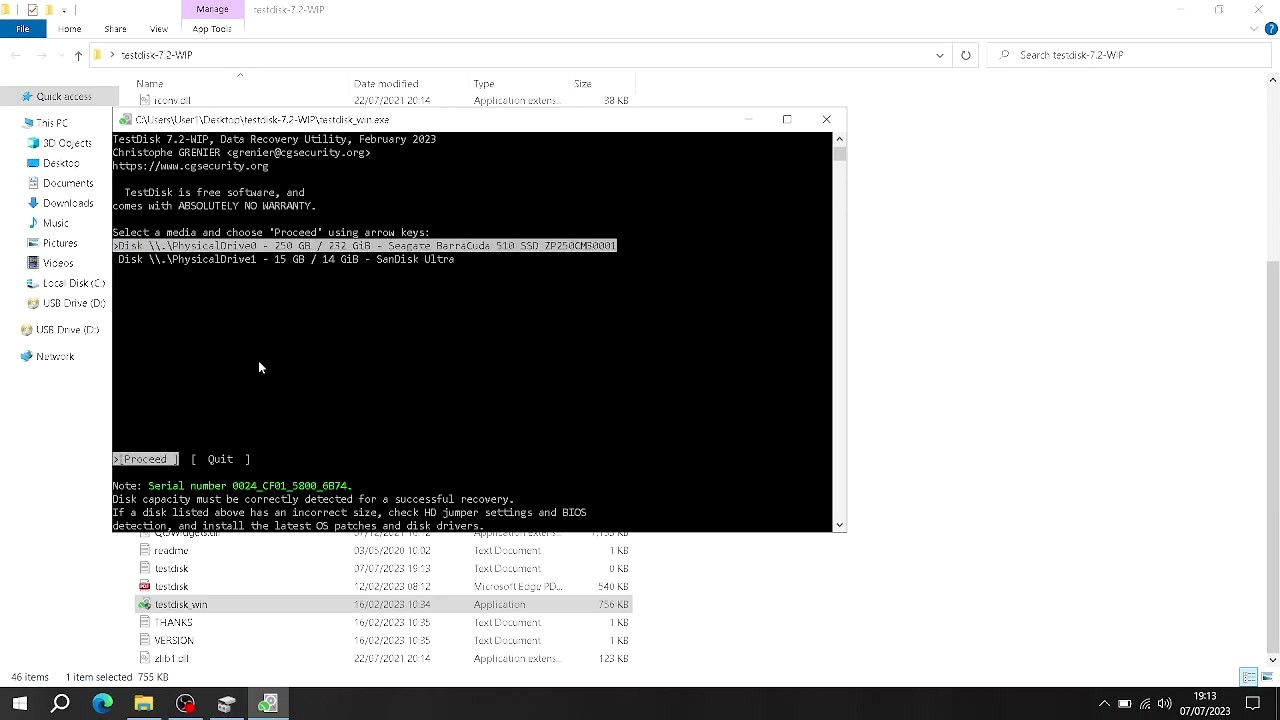
Step A: Select Your Disk
Use the up/down arrow keys to highlight the disk that contains the lost partition. Verify by checking the disk size and model name. Press Enter to proceed. Be careful here – picking the wrong disk wastes time but will not cause damage (TestDisk is read-only until you write).
Step B: Choose Analyse
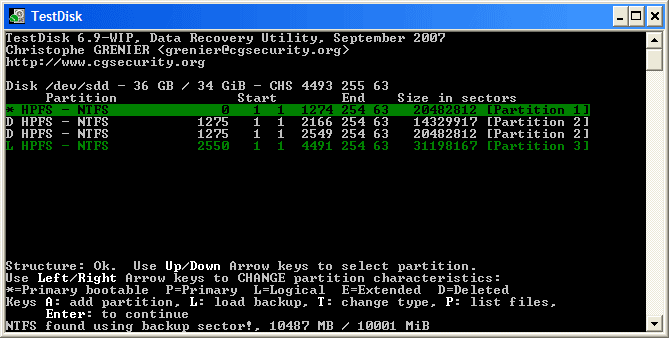
From the main menu, select Analyse and press Enter. TestDisk reads the current partition table and shows you what the disk currently looks like. If partitions are missing, you will see gaps or smaller-than-expected entries.
Step C: Run Quick Search
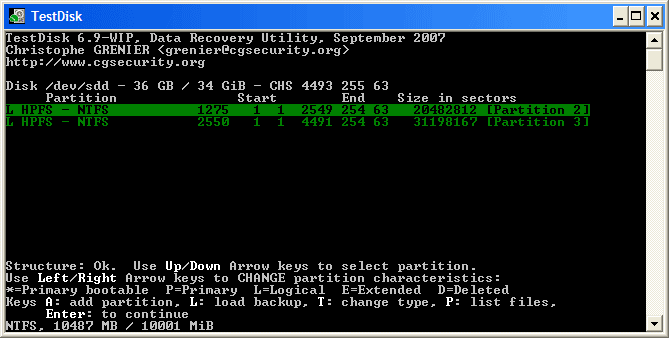
Press Enter on Quick Search. TestDisk scans the disk surface looking for partition headers and boot sectors. This usually finishes in 1-5 minutes depending on disk size. Found partitions appear in real-time as green-highlighted rows.
Step D: Verify Found Partitions
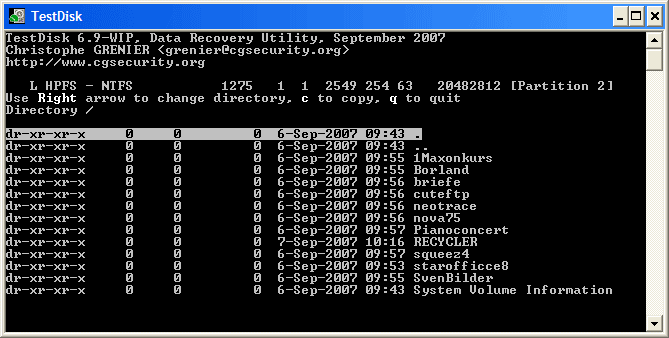
For each partition TestDisk finds, highlight it and press P to list the files inside. If you can see your files (folders like Documents, Program Files, etc.), the partition is recoverable. Press Q to return to the partition list.
If Quick Search misses your partition, select Deeper Search at the bottom. This performs a sector-by-sector scan that takes longer (15-60 minutes on large drives) but catches partitions that Quick Search cannot find.
Step E: Write the Recovery
When you have confirmed all partitions look correct, select Write at the bottom of the screen. TestDisk asks for confirmation – press Y to confirm. It writes the corrected partition table to disk. Press Enter on OK, then quit TestDisk and reboot your computer. After the reboot, your recovered partitions should appear in File Explorer or Disk Management.
Keyboard Reference
| Key | Action |
|---|---|
| ↑ ↓ | Navigate between disks, partitions, and menu items |
| ← → | Change partition status (Primary, Logical, Deleted) |
| Enter | Confirm selection or proceed to next step |
| P | List files on the highlighted partition |
| C | Copy files from a damaged partition to another disk |
| Q | Go back / quit current screen |
| Y | Confirm write operations |
Tips, Tricks & Best Practices
Stop using the affected drive immediately. Every write operation to a disk with lost partitions risks overwriting recoverable data. If your main boot drive lost a partition, power down and connect the drive to another PC as a secondary disk, or boot from a Linux live USB and run TestDisk from there.
Use the Advanced menu for boot sector repair. If your partition is visible but Windows will not boot from it, go to TestDisk → Analyse → Advanced → select the partition → Boot. TestDisk can rebuild NTFS and FAT32 boot sectors from their backup copies. This often fixes “BOOTMGR is missing” or “Operating System not found” errors without a full reinstall.
Copy files before writing. If you are unsure about the recovery, press C on any found partition to copy individual files to a separate drive. This way you can rescue your data without modifying the original disk at all.
Use PhotoRec for deleted file recovery. TestDisk recovers partitions, but if you need to recover individual deleted files (emptied recycle bin, formatted drive), run photorec_win.exe from the same folder. PhotoRec carves files by signature and supports over 480 file formats including JPG, PDF, DOCX, and MP4.
Create a disk image first. For irreplaceable data, consider imaging the entire disk before recovery. Use dd on Linux (sudo dd if=/dev/sda of=/path/to/backup.img bs=4M status=progress) or a tool like Win32 Disk Imager on Windows. TestDisk can scan disk image files directly.
Ready to recover your data? Download TestDisk 7.2 and follow the steps above.
Frequently Asked Questions
Answers to common questions about TestDisk partition recovery, installation, safety, and troubleshooting.
Is TestDisk safe to download and use?
Yes, TestDisk is safe. It has been actively maintained since 1998 by Christophe Grenier at CGSecurity and distributed under the GNU GPL v2.0 open-source license, meaning its source code is publicly auditable on GitHub.
The official TestDisk 7.2 download (released February 2, 2024) passes all major antivirus scans, including VirusTotal, where the Windows 64-bit zip file (26.4 MB) returns zero detections across 70+ engines. Because it is a portable application with no installer, there is no bundled adware, toolbar, or third-party software included. The program does require administrator or root privileges to access raw disk sectors, which is standard for any disk utility that reads partition tables directly.
- Source code on GitHub with 2,300+ stars and active community review
- No installation process means nothing writes to your Windows Registry
- Used by IT professionals, forensic analysts, and system administrators for over 25 years
- Distributed by major Linux repositories (Ubuntu, Fedora, Arch) which run their own security audits
Pro tip: Only download TestDisk from the official CGSecurity website or from our download section. Third-party download sites sometimes repackage the zip with unwanted software or outdated versions.
For more about what TestDisk can do, check our features overview.
Is TestDisk free from malware and spyware?
TestDisk is completely free from malware, spyware, and adware. As an open-source project under the GPL v2.0 license, every line of code is publicly available for inspection on the CGSecurity GitHub repository.
The official TestDisk 7.2 binary has been scanned by VirusTotal and consistently returns 0/70+ detections. Some antivirus programs occasionally flag TestDisk as a “potentially unwanted program” (PUP) because it accesses raw disk sectors and partition tables directly. This is a false positive triggered by its low-level disk access behavior, not because it contains anything harmful. Disk recovery tools like TestDisk, PhotoRec, and ddrescue all perform raw disk reads, which is exactly what triggers these heuristic alerts.
- If Windows Defender or another AV flags the download, check the file hash against the official SHA-256 posted on the CGSecurity download page
- The Windows 64-bit zip is 26.4 MB and the Linux tarball is 7.5 MB – significantly larger files may indicate a tampered repackage
- TestDisk runs entirely from its extracted folder without background services or network connections
Pro tip: Verify the SHA-256 checksum of your download against the value on the CGSecurity wiki page. If the hash matches, the file is authentic and untampered.
Download the verified official build from our download section.
Where is the official safe download for TestDisk?
The official TestDisk download comes from CGSecurity.org, the developer Christophe Grenier’s website. You can also grab it from our download section, which links directly to the official distribution files.
TestDisk 7.2 is available as a portable zip or tarball – there is no traditional installer. The official download page at cgsecurity.org/wiki/TestDisk_Download provides builds for Windows (32-bit and 64-bit), macOS Intel, Linux x86_64, FreeBSD, and DOS. Each download is a compressed archive containing the testdisk executable, PhotoRec, and documentation files. The Windows 64-bit archive is 26.4 MB, the Linux build is 7.5 MB, and the macOS Intel build is 1.5 MB.
- Official source: cgsecurity.org/wiki/TestDisk_Download
- GitHub releases: github.com/cgsecurity/testdisk
- Linux users can also install via package managers:
sudo apt install testdiskon Ubuntu/Debian orsudo pacman -S testdiskon Arch Linux - Avoid sites like Softonic, CNET Download, or FileHippo that wrap open-source tools in their own installers
Pro tip: On Linux, the repository version may lag behind. For the latest 7.2 release, download the static binary directly from CGSecurity rather than relying on your distro’s package manager.
See our Getting Started guide for full download and extraction instructions.
Does TestDisk work on Windows 11?
Yes, TestDisk 7.2 works on Windows 11 without any issues. It supports Windows Vista through Windows 11, in both 32-bit and 64-bit editions.
TestDisk runs as a portable console application on Windows 11. You extract the zip file, right-click testdisk_win.exe, and select “Run as administrator.” The program opens in a Command Prompt window with a text-mode interface. Because it is a standalone executable with no installer or system dependencies, there are no compatibility layers or workarounds needed for Windows 11. The 64-bit build (26.4 MB) is the recommended download for any modern Windows system. TestDisk handles GPT partition tables (standard on Windows 11 UEFI systems) as well as legacy MBR partition schemes.
- Works on Windows 11 23H2, 24H2, and all Insider builds tested
- Handles GPT, EFI System Partitions, and UEFI boot configurations
- Requires “Run as administrator” – right-click the exe or launch from an elevated Command Prompt
- Windows SmartScreen may show a warning on first run since the exe is unsigned – click “More info” then “Run anyway”
Pro tip: If Windows SmartScreen blocks TestDisk, open an elevated Command Prompt first (Win+X then “Terminal (Admin)”), navigate to the extracted folder, and type testdisk_win.exe directly. This bypasses the SmartScreen dialog entirely.
Check our system requirements for the full list of supported operating systems.
Does TestDisk work on macOS and Linux?
Yes, TestDisk is cross-platform. It runs on macOS 10.6 (Snow Leopard) and later, plus Linux kernel 2.6.18 and above. It also supports FreeBSD, NetBSD, OpenBSD, SunOS, and DOS.
On macOS, TestDisk is distributed as a 1.5 MB tarball for Intel x86_64 processors. Apple Silicon (M1/M2/M3) users can run it through Rosetta 2 translation, or install it via Homebrew with brew install testdisk, which provides a native ARM build. On Linux, the static binary (7.5 MB for x86_64) requires no dependencies beyond ncurses, which is pre-installed on virtually every distribution. Most major distros also carry TestDisk in their official repositories.
- macOS: Download the tarball and run
sudo ./testdiskfrom Terminal - Ubuntu/Debian:
sudo apt install testdisk - Fedora/RHEL:
sudo dnf install testdisk - Arch Linux:
sudo pacman -S testdisk - Root or sudo access required on all platforms for raw disk access
Pro tip: On macOS Ventura and later, you may need to grant Terminal full disk access in System Settings > Privacy & Security > Full Disk Access before TestDisk can scan internal drives.
Visit our download section for platform-specific download links.
Does TestDisk work on external hard drives and USB drives?
Yes, TestDisk works on external hard drives, USB flash drives, SD cards, and any block storage device your operating system can detect. It reads partition tables and filesystem structures regardless of the connection type.
When you launch TestDisk, it lists all connected disks, including USB drives, external HDDs/SSDs, and memory card readers. The disk selection screen shows device names alongside manufacturer info and capacity. TestDisk supports partition recovery on external drives formatted with FAT12, FAT16, FAT32, exFAT, NTFS, ext2, ext3, ext4, HFS+, and many other filesystems. For USB drives, the most common recovery scenario involves accidentally deleted FAT32 or exFAT partitions, which TestDisk handles well.
- Connect the external drive before launching TestDisk so it appears in the disk list
- On Windows, the drive may show as
\\.\PhysicalDrive1or similar - On Linux, external drives typically appear as
/dev/sdb,/dev/sdc, etc. - For drives that show incorrect capacity (e.g., a 2 TB drive appearing as 137 GB), connect it via SATA instead of USB to rule out USB bridge limitations
Pro tip: If your external drive does not appear in TestDisk’s disk list, try a different USB port or cable. Some USB hubs and docking stations block the low-level access that TestDisk needs. A direct USB connection to the motherboard usually fixes this.
See our Getting Started guide for a walkthrough of the disk selection process.
Is TestDisk completely free to download and use?
Yes, TestDisk is 100% free. There is no paid version, no premium tier, no trial limitation, and no feature gating. Every capability is available to every user at no cost.
TestDisk is released under the GNU General Public License v2.0, which means you can download, use, modify, and redistribute it freely. Unlike commercial recovery tools like R-Studio ($79.99), Disk Drill ($89), or EaseUS Data Recovery Wizard ($69.95/year), TestDisk does not restrict scan depth, file count, or recovery size in a free tier. The developer, Christophe Grenier, funds the project through voluntary donations on the CGSecurity download page. PhotoRec, the companion file carving tool bundled with TestDisk, is also completely free under the same license.
- No registration, no account creation, no license key required
- No scan limitations – full deep search on any size drive
- No recovery limits – recover unlimited partitions and files
- No ads, no upsell prompts, no “upgrade to unlock” dialogs
Pro tip: If you find TestDisk useful, consider making a donation to CGSecurity. The project relies entirely on community support and Christophe Grenier’s personal time. The donation link appears on the download page.
Download the full, unrestricted version from our download section.
Is TestDisk free for commercial use?
Yes, TestDisk is free for commercial use. The GPL v2.0 license permits use in any context, including business, enterprise, government, and educational environments without fees or special licensing.
IT service providers, data recovery shops, and system administrators routinely use TestDisk in professional settings. The GPL license only requires that if you modify and redistribute the source code, those modifications must also be released under the GPL. Simply using TestDisk as a tool in your business carries no such obligation. Many managed service providers (MSPs) keep TestDisk on bootable USB drives alongside other recovery utilities as part of their standard toolkit.
- Use it at work, in client environments, or as part of paid data recovery services – no restrictions
- No per-seat licensing, no enterprise pricing, no volume discounts needed
- Can be included on bootable recovery media (WinPE, Linux live USB) for field technicians
- Some data recovery businesses charge clients for the service while using free tools like TestDisk and PhotoRec internally
Pro tip: For enterprise deployments, download the portable zip and distribute it via your internal software repository or network share. No installation means no conflict with software asset management policies.
Review the full feature set on our features page to see what TestDisk offers for professional use.
How do I install TestDisk on Windows?
TestDisk does not have a traditional installer. You download a zip file, extract it, and run the executable directly. The whole process takes about 30 seconds.
TestDisk is a portable application, meaning it runs from whatever folder you extract it to without modifying your Windows Registry or system files. The Windows 64-bit zip (testdisk-7.2.win64.zip) is 26.4 MB. After extraction, the folder contains testdisk_win.exe, photorec_win.exe, qphotorec_win.exe (a GUI version of PhotoRec), several DLL files, and documentation. No additional dependencies, frameworks, or runtimes are required.
- Download the Windows 64-bit zip from our download section
- Right-click the downloaded zip file and select “Extract All” (or use 7-Zip / WinRAR)
- Open the extracted
testdisk-7.2folder - Right-click
testdisk_win.exeand select “Run as administrator” - If Windows SmartScreen warns you, click “More info” then “Run anyway”
- TestDisk opens in a console window – select “Create” to start a new log file
Pro tip: Extract TestDisk to a permanent location like C:\Tools\testdisk-7.2\ rather than your Downloads folder. If you need TestDisk, you are probably dealing with a disk emergency and don’t want to waste time re-downloading. A common mistake is trying to run it from inside the zip without extracting first, which causes the “cygwin1.dll not found” error.
Our Getting Started guide walks through the full setup and first recovery.
TestDisk portable vs installer – which version should I choose?
There is only one version of TestDisk, and it is portable. TestDisk does not offer a traditional installer, so there is no choice to make. Every download is the portable edition.
This is actually one of TestDisk’s advantages. The portable zip archive runs from any folder, including a USB flash drive, without installing anything on the host system. For data recovery scenarios, this is ideal because you want to avoid writing to the drive you are trying to recover data from. Installing software onto a damaged system could overwrite the exact sectors you need. TestDisk’s portable design sidesteps that risk entirely. The Windows build (26.4 MB) includes all dependencies in the extracted folder – no .NET, no Visual C++ redistributable, no system-level drivers.
- Keep TestDisk on a USB drive alongside other recovery tools so it is always ready
- No Registry entries, no Start Menu shortcuts, no background services
- To “uninstall,” just delete the folder – nothing else to clean up
- Works from WinPE recovery environments and Linux live USB drives
Pro tip: Create a dedicated recovery USB drive with TestDisk, PhotoRec, and a bootable Linux distro like SystemRescue. If Windows itself won’t boot, you can boot from the USB and run TestDisk to repair the partition table or boot sector without needing a working OS.
See the system requirements to confirm your setup is compatible.
TestDisk is not finding my partition – what should I do?
If TestDisk’s Quick Search does not find your partition, run a Deeper Search. The Deeper Search scans for backup boot sectors and filesystem signatures across the entire disk surface, catching partitions that the Quick Search misses.
The Quick Search reads the partition table and checks for common partition structures. If the partition table is severely damaged or the partition was overwritten, Quick Search may come up empty. Deeper Search is slower but more thorough – on a 1 TB drive connected via USB 3.0, expect it to take 30 minutes to 2 hours depending on disk speed. On a 4 TB drive, it could take 4-8 hours. During the search, TestDisk displays found partitions in real time. If you see your partition listed, you can press Enter to stop the search early and proceed with recovery.
- Start TestDisk and select the correct disk (verify the size matches your drive)
- Choose the partition table type – usually “Intel” for MBR or “EFI GPT” for modern systems
- Select “Analyse” then “Quick Search”
- If nothing is found, select “Deeper Search” when prompted
- When partitions appear, press
pto list files and verify the partition contains your data - If files are listed correctly, go back and select “Write” to restore the partition table
Pro tip: Before selecting “Write,” always press p to browse the partition’s files. If the file listing looks wrong or shows garbage names, that partition entry is a false positive. Only write a partition back to the table if you can confirm it contains the right data.
For a full recovery walkthrough, see our Getting Started guide.
TestDisk deep search is taking too long – how to speed it up?
TestDisk’s Deeper Search reads every sector on the disk, and there is no way to skip ahead or make it faster. The scan time depends on the disk size and connection speed, not on your CPU or RAM.
A Deeper Search on a 500 GB SATA SSD finishes in under 15 minutes. On a 2 TB hard drive connected via USB 2.0, it can take 10-12 hours. The bottleneck is always disk I/O throughput. If your external drive is connected through a USB 2.0 port (maxing out at about 30 MB/s), switching to a USB 3.0 port can cut the scan time by 5-8x. For internal SATA drives, scan speeds typically range from 100-200 MB/s on HDDs and 400+ MB/s on SSDs.
- Connect USB drives to a USB 3.0 or 3.1 port (blue port) instead of USB 2.0
- Use a direct SATA connection instead of a USB enclosure when possible
- If the drive has bad sectors, they cause read timeouts that dramatically slow the scan – each bad sector can add 5-30 seconds of delay
- Do not run other disk-intensive programs during the scan
- You can safely close the laptop lid or let the screen turn off without interrupting TestDisk, but disable sleep/hibernate in Windows power settings
Pro tip: If the scan stalls at a specific percentage for more than 30 minutes, the drive likely has physical bad sectors at that location. Consider cloning the drive first with ddrescue to a healthy disk, then running TestDisk on the clone instead.
Check our features section for more on TestDisk’s scan capabilities.
How to fix “cygwin1.dll not found” error in TestDisk?
The “cygwin1.dll not found” error means you tried to run TestDisk directly from inside the zip archive without extracting it first. Extract the entire zip folder and the error goes away.
Windows lets you browse inside zip files as if they were folders, but executables inside a zip cannot access their companion DLL files. TestDisk’s Windows build depends on cygwin1.dll, cygz.dll, cygncursesw-10.dll, and other libraries that must be in the same directory as the exe. When you double-click testdisk_win.exe from within the zip preview, Windows copies only the exe to a temporary location and runs it alone, without the DLLs. This is the single most common TestDisk error reported on the CGSecurity forums.
- Right-click the downloaded
testdisk-7.2.win64.zipfile - Select “Extract All…” and choose a destination folder (e.g.,
C:\Tools\testdisk-7.2\) - Open the extracted folder and run
testdisk_win.exefrom there - If you still get the error, check that all DLL files are present in the same folder as the exe
Pro tip: If you use 7-Zip or WinRAR, make sure you extract the full archive and not just the exe. Some users drag only testdisk_win.exe to their Desktop, which causes the same DLL error. The entire contents of the zip must stay together in one folder.
Our Getting Started guide covers the extraction step in detail.
How do I update TestDisk to the latest version?
TestDisk has no built-in auto-update mechanism. To update, download the latest zip from the CGSecurity website and extract it, replacing your old folder.
The current stable release is TestDisk 7.2, released on February 2, 2024. Development builds (labeled 7.3-WIP) are also available on the CGSecurity download page for users who want the newest fixes and features before they reach a stable release. Since TestDisk is portable and stores no settings or preferences on your system, updating is simply a matter of downloading the new archive and extracting it. Your old version can be deleted or kept alongside the new one with no conflicts.
- Check the current version: launch TestDisk and the version number appears on the first screen (e.g., “TestDisk 7.2”)
- Visit our download section or the CGSecurity download page to see if a newer version exists
- Download the new zip and extract it to a new folder
- Delete or archive your old TestDisk folder
Pro tip: Linux users can update through their package manager (sudo apt update && sudo apt upgrade testdisk), but repository versions often lag behind official releases. For the latest build, grab the static binary from the CGSecurity site directly.
See our download section for the latest TestDisk version.
What is new in TestDisk 7.2?
TestDisk 7.2, released on February 2, 2024, added APFS (Apple File System) partition detection, improved exFAT support, and fixed several issues with GPT partition table handling.
The previous stable release was TestDisk 7.1 (July 2019), so version 7.2 represents almost five years of accumulated changes. Key improvements include better handling of 4Kn (4096-byte sector) drives, which are increasingly common in modern NVMe SSDs and large-capacity HDDs. The ext4 filesystem support received fixes for inline data and large directory handling. PhotoRec, bundled with TestDisk, also gained new file format signatures, bringing the total to over 480 supported file types for carving recovery.
- APFS detection for macOS Catalina, Big Sur, Monterey, Ventura, and Sonoma volumes
- Improved exFAT partition recovery and file undelete
- Better support for drives with 4096-byte physical sectors
- GPT partition table handling fixes for UEFI-based systems
- Updated PhotoRec with additional file format signatures
- Bug fixes for NTFS MFT analysis on very large volumes
Pro tip: If you are working with a Mac formatted with APFS (standard since macOS High Sierra in 2017), you need TestDisk 7.2 or the 7.3-WIP development build. Older versions like 7.1 cannot detect APFS partitions at all.
Download the latest version from our download section.
TestDisk vs Recuva – which is better for data recovery?
TestDisk and Recuva solve different problems. TestDisk specializes in partition recovery and boot sector repair. Recuva specializes in recovering individual deleted files from working partitions. Use TestDisk when your entire partition is missing or your disk won’t boot. Use Recuva when you accidentally deleted specific files.
TestDisk is a command-line tool that rebuilds corrupted partition tables, repairs FAT/NTFS boot sectors, and restores lost partitions. Recuva (by Piriform, the CCleaner company) is a GUI application that scans existing partitions for deleted files and lets you recover them with a file browser. Recuva is easier to learn because it has a wizard-based interface, but it cannot fix a partition table or repair a boot sector. TestDisk is harder to use but handles structural disk problems that Recuva cannot touch.
- TestDisk: Free, open-source, cross-platform (Windows/macOS/Linux), command-line, partition-level recovery, boot sector repair, supports 30+ filesystems
- Recuva: Free with Pro version ($19.95), Windows only, GUI with wizard, file-level recovery from FAT/NTFS/exFAT, cannot repair partition tables
- For a disappeared drive letter or “unallocated” disk in Disk Management, TestDisk is the right choice
- For “I emptied the Recycle Bin and need those photos back,” Recuva is simpler and faster
Pro tip: You can use both tools together. First, use TestDisk to recover the missing partition and make it visible again. Then, if some files are still missing after partition recovery, run Recuva on the restored partition to scan for individually deleted files.
Learn more about TestDisk’s capabilities on our features page.
TestDisk vs R-Studio – detailed comparison
R-Studio is a professional-grade commercial recovery suite priced at $79.99 and up. TestDisk is free and open-source. R-Studio has a richer GUI and handles RAID recovery natively, while TestDisk excels at partition table repair and boot sector reconstruction.
R-Studio (by R-Tools Technology) offers a full graphical interface with hex viewing, RAID reconstruction, disk imaging, and network recovery. It supports over 20 filesystems and can recover data across a network. TestDisk focuses specifically on partition-level recovery and boot repair in a terminal interface. For forensic and enterprise data recovery work with RAID arrays, R-Studio is more capable. For straightforward partition recovery on a single disk, TestDisk does the job at zero cost.
- R-Studio: $79.99 (single license), GUI, RAID support, network recovery, hex editor, disk imaging, Windows/macOS/Linux
- TestDisk: Free (GPL v2.0), terminal-based, no RAID rebuild, no network scanning, partition recovery + boot repair, Windows/macOS/Linux/FreeBSD/DOS
- R-Studio’s demo mode limits recovered file size to 256 KB. TestDisk has no such limit.
- For IT shops doing paid data recovery, R-Studio’s polish and RAID handling justify the license cost
- For personal use or one-time recovery, TestDisk paired with PhotoRec covers most scenarios
Pro tip: If you are recovering data from a failed RAID-5 or RAID-6 array, R-Studio or a similar commercial tool with RAID reconstruction is the right choice. TestDisk can work on individual member disks, but it has no built-in RAID array reassembly logic.
See our features overview for the complete list of what TestDisk handles.
Can TestDisk recover deleted files?
Yes, TestDisk can recover deleted files from FAT, exFAT, NTFS, and ext2 filesystems. For other filesystems (ext3, ext4, HFS+, etc.), use PhotoRec, which is bundled in the same download.
TestDisk’s file undelete feature works by scanning the filesystem’s file allocation structures for entries marked as deleted. On NTFS, it reads the Master File Table (MFT) for records flagged as removed. On FAT/exFAT, it checks directory entries for the deleted marker byte (0xE5). This approach is fast but limited to filesystems where directory metadata is preserved. For ext3 and ext4, Linux’s journaling design makes traditional undelete difficult, so PhotoRec’s file carving approach (which scans for file headers and footers regardless of filesystem metadata) is more reliable.
- Launch TestDisk and select the disk containing deleted files
- Choose “Advanced” from the main menu
- Select the partition and choose “Undelete”
- TestDisk lists recoverable files with their names, dates, and sizes
- Select files and press
cto copy them to a recovery destination - Choose a destination on a different drive (never recover to the same disk)
Pro tip: If you need to recover files from ext4 or any filesystem not supported by TestDisk’s undelete, run photorec_win.exe (or photorec on Linux) from the same folder. PhotoRec recovers files based on signatures and works across all filesystem types, including damaged and reformatted drives. It supports over 480 file formats.
Our Getting Started guide covers both partition recovery and file undelete workflows.
How to recover a lost partition with TestDisk step by step?
Recovering a lost partition with TestDisk takes about 10-30 minutes for a Quick Search on most drives. The process involves selecting the disk, analyzing the partition structure, verifying the found partition, and writing the corrected partition table.
This walkthrough covers the standard recovery scenario where a partition disappeared from Windows Disk Management or shows as “unallocated space.” TestDisk scans the disk surface for filesystem signatures and boot sector backups to locate the missing partition boundaries. Once found, it writes the corrected partition table entries, and after a reboot, the partition reappears with all files intact. This works because deleting a partition only removes the partition table entry, not the actual data.
- Run TestDisk as administrator and select “Create” to start a log file
- Select the disk that contained the lost partition (verify by size and model name)
- Choose the partition table type: “Intel” for MBR disks or “EFI GPT” for modern UEFI systems
- Select “Analyse” to examine the current partition structure
- Select “Quick Search” to scan for lost partitions
- When TestDisk lists found partitions, press
pon each one to browse its files and verify it is the correct partition - If the partition is correct, go back and press Enter to continue
- Select “Write” to save the restored partition table to disk
- Reboot your computer – the partition should now be visible in Windows Explorer
Pro tip: If Quick Search misses your partition, select “Deeper Search” at the prompt. Also, always verify the partition by listing files (press p) before writing. Writing an incorrect partition entry can make the situation worse if partitions overlap. The TestDisk log file (saved in the same folder) records everything you did, useful if you need to ask for help on the CGSecurity forum.
Read our complete Getting Started guide for screenshots and detailed explanations of each screen.
Still have questions? Visit the CGSecurity Forum for community support, or check our Getting Started guide.